
I am always looking for new ways to use or reuse household items. This has rubbed off on my daughter Lucy. She never throws anything away, instead she hands it to me and says, “here, this is for art projects.” One of my favorite techniques is dipping an empty toilet paper roll in paint and using it as a stamp on journal pages. They make great circles, but are also easy to reshape so that you can create other unique stamps on your page. But the cardboard tubes are really durable and will last quite some time so I am constantly thinking of other ways to re-purpose them.
One day I was holding an empty roll while I was doing something else and began to mindlessly unravel the cardboard. Then I folded it half and realized that it made two perfect triangles that could be used for pieces in a banner.

The upcoming Thanksgiving holiday gave me an idea for a banner that would combine Lucy’s love of giving me things for art projects with a lesson in gratitude for my kids. So I gave Lucy the assignment of helping me collect empty toilet paper rolls, a job she was very happy to accept (hopefully she’ll be as excited about cleaning up her room someday).
In order to create a banner, you only need a few simple materials:
- Toilet paper rolls (each one either makes two triangular banner pieces if you cut it in half, or if you prefer to have a slightly thicker piece, you can simply fold it over and glue, staple or tape the two halves together to make one piece).
- Twine or ribbon to connect the banner pieces
- Scissors
- Materials to decorate your pieces (paint, markers, collage materials, glue, stickers, stamps, stencils and ink, glitter, etc… The sky is the limit, you can make your banner as fancy or as simple as you desire)
- A hole punch or awl
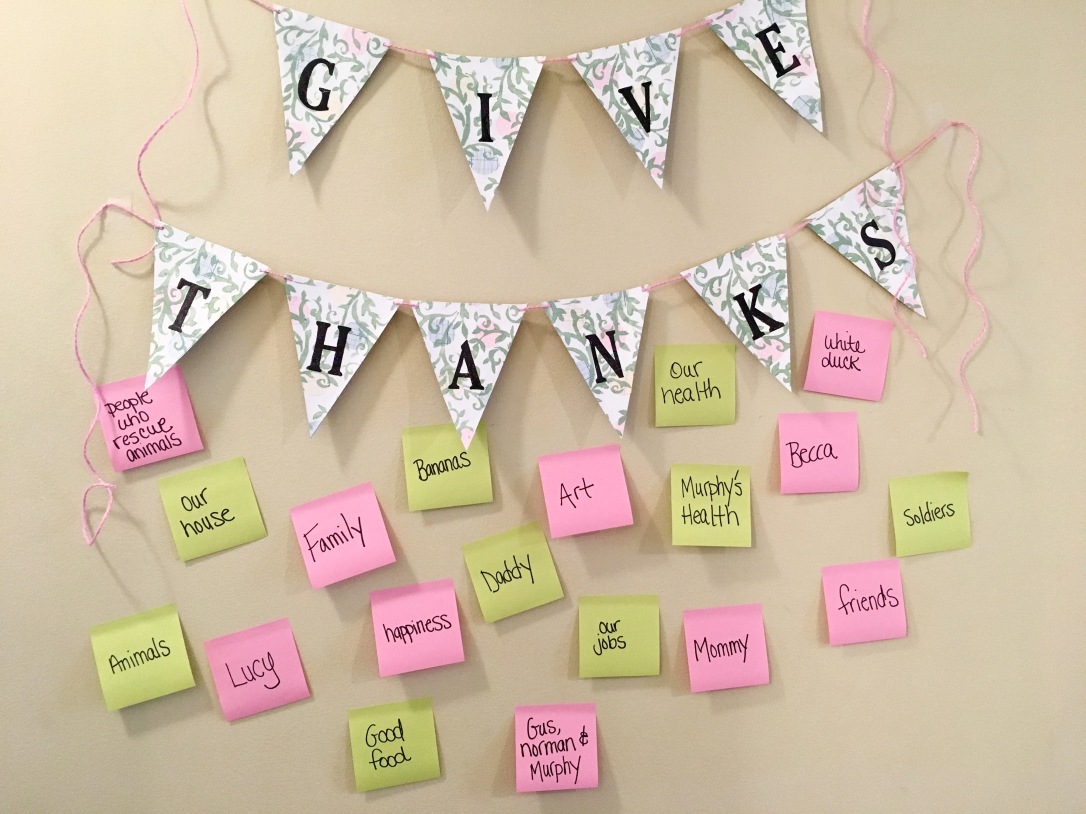
Begin by deciding how many banner pieces you’ll need. I wanted my banner to say “Give Thanks” so I cut 10 pieces.
Since the tube was round, the edges of your pieces will turn up a bit when you cut them. You can either place them under a stack of books overnight or iron them (I placed a thin cloth between the cardboard and the iron). If you iron them, you must do this before you add paint and/or ephemera.

Once you have the correct number of flattened pieces, you can begin to decorate them. I kept my design relatively simple and chose a few of my favorite colors of paint, collage materials, a stencil and rubber stamps for the letters. You will need to punch holes in the corners of your pieces so that they can be strung together. You can either do this before you apply your design or after, it’s really up to you.


When you are happy with your design and you’ve allowed enough time for materials to dry (if necessary), you are ready to string the pieces together. Cut a piece of string, twine or ribbon to your desired length. Thread your twine through the front hole of your first banner piece (depending on what type of twine or string you use, you may need to tie knots around the holes to keep the banner pieces in place). Run the twine behind the piece then through the next hole and out the front. Tie another knot if necessary. Repeat this sequence for the remaining pieces, but be sure to allow some space between them on the banner and enough space on the ends to hang it up.


Once you’re done, clip the twine and hang your banner!

I am working on teaching my kids about gratitude and how important it is to be thankful not only for the big things in our lives, but the little things too. So once our banner was hung on the wall, I grabbed a stack of sticky notes and a Sharpie and asked my kids (ages 2 and 5) what they are thankful for. Very quickly the wall was filled with amazing, heartwarming thoughts of gratitude and love (including Becca’s love for bananas). It’s on a wall in a hallway that gets a lot of traffic in our house so we will constantly be reminded of all the things we have to be thankful for. And I left the stack of sticky notes and Sharpie out so that we can continue to add to it all season long.
I’d love to see the banners you create! If you post pictures to Instagram, be sure to use #TheFoundArtWalkGratitudeBanner

Love love love this !
Sent from my iPad
LikeLiked by 1 person
I love that you repurposed…
LikeLiked by 1 person
Thank you! They were a lot of fun to make.
LikeLike